
Brewing with Beer Kits
Commercial beer is usually made from a mixture of Pale Malt and roasted malts that are used to provide colour and flavour. Home Brew beer kits are made from concentrated Malt Extract and almost all single can/pack beer kits contain 1.5-1.8 kgs of malt extract. This malt extract needs to be diluted with water to make a 5 gallon/23ltr sugar rich mixture and then fermented. (If you have a two can kit you can still follow MOST of these instructions but some differences in technique apply)
These instructions are based on the Brewbuddy Bitter Kit that is supplied with our standard Starter Kits. If you are using a different single can kit you should follow the maker's instructions as they may vary from these instructions, but the general principle will be the same. (The Brewmaker range of single can differs from these instructions in that it requires you to actually simmer the malt extract in boiling water for 5 minutes before adding to the brewing bin and topping up with cold water). If you are using a Two Can Kit rather than a Single Can kit you will not need to add any additional sugar or spraymalt until you get to the bottling or barrelling stage.
Getting going:
Remove the label from the beer kit and place the unopened beer kit in hot water to soften the Malt Extract. Most single can beer kits have the brewing instructions on an instruction sheet which is either under the cap with the yeast sachet or inside the box, (eg Hambleton Bard), but some, including the Brewbuddy, Perfect Pint and Youngs Harvest ranges, have them printed on the can label, so care should be taken to check before ripping the label off......
 |  |  |  |
Sterilise the brewing bin, and all the other equipment to be used, using a proprietary sterilising agent for the specified amount of time. Generally 10-15 minutes is sufficient. I've got my can opener, heater (making sure I keep the plug completely dry), thermometer, hydrometer and test jar going into the bin here. Don't forget to sterilise the lid of the brewing bin. The lid used in these photos has a hole in the top which takes the bung for an airlock or to allow my thermostatic heater through. ( 2014 update - As a result of a change in the design of the heaters, the ones currently available are marginally too big to fit through the hole for the bung and as a result I have now cut a notch in the rim of the bucket using a "Round File". This notch is approximately 5-6mm deep and allows the cable from the heater to pass over the rim whilst still allowing the lid to be properly sealed in place.)
 |  |  |
 |  |  |
Rinse the bin with clean water and drain. Open the beer kit and empty the contents of your chosen beer kit into the brewing bin and add 3 litres/6 pints of boiling water.
Holding the empty can with a tea towel, half fill it with boiling water and swirl it around to dissolve the remaining malt extract and clean the can. The tea towel stops you burning your hands or dropping the wet can and spilling the hot, sticky contents all over the floor.
 |  |  |  |
 |  |  |
The beer kit instructions tell you to add 1kg/2.2lb of sugar at this point and mix thoroughly to ensure that the sugar and malt is completely dissolved.
If you are making a two can kit, add the second can and leave out the sugar. Add 19 litres/33 pints of cold water to bring the volume up to 23 litres/5 gallons.
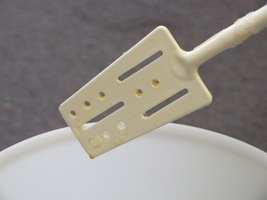
I prefer to mix the malt extract in the hot water using the long handled spoon until fully dissolved and the spoon looks like this..........
and then top up the brewing bin to the 20ltr mark. By stopping here and checking the temperature, you can either raise it to the target temperature by adding a couple of litres of hot water, or cool it down by topping it up with cold water. It is far better to adjust the temperature in this way so that the yeast can be added to the wort (the malty, sugary liquid) as soon as possible rather than leaving it open to the air and running the risk of absorbing any airborne infections. As you can probably see from the photo, I tend to use Tesco's Value Still bottled water in my brewing. This is because I live in a "hard water" area and my tap water can contain large amounts of calcium and often has a strong chlorine taste. If you are lucky enough to live in a "soft water" area, or don't mind the taste of your local water, you can happily use your local water instead of bottled water. The bottled water has another advantage in that you can, if you wish, save the bottles and use them to store your finished brew.
 |  |  |  |
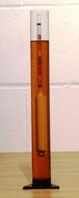
This is the point at which I tend to add the sugar (unless, of course, I am using a two can kit in which case NO sugar is needed at this point). In these photos I am using Brewing Sugar which is much finer than normal granulated sugar and promotes a quicker start to fermentation and a smoother finish to the beer. Soft brown sugar can also be used and will slightly darken the colour of the finished beer and give a richer flavour. Even though we have so far tried really hard to avoid airborne infections getting into the wort, it is important to stir the wort vigorously for a couple of minutes to get some oxygen into it as this help the yeast to function properly. I generally now take a sample of the wort in the test jar and use the hydrometer to determine the "Original Gravity". This is simply a measure of the total amount of sugar in the wort and gives an indication of the potential strength of the finished beer. (This particular brew had an OG of 1040, which means I should end up with an ABV (alcohol strength) of approximately 4.3%).

When the temperature cools to between 18º-23ºC sprinkle the yeast over the surface of the liquid and stir to disperse. If the mixture is too hot, the yeast may be killed off and fermentation will fail.
Some kits recommend making up and using a yeast "starter". This simply means putting the yeast in a cup of warm water in which a few spoonfuls of sugar have been dissolved and leaving for 15-30 minutes to get going. Doing this about 30 mins before you start to brew means that when you add it to the brewing mixture it will start fermenting more or less straight away and reduce the risk of infection. It is not absolutely necessary, but it is good practice and will do no harm.
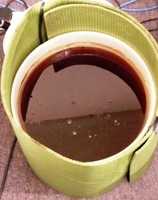
Cover the brewing bin with the lid provided and place in a warm, draught free location where the temperature is likely to remain stable at around 18º-21ºC. If you have a thermostatically controlled heating element or a brewbelt (a flexible heater that wraps around the outside of the brewing bin rather than being inserted into it), you can place the beer in a garage or shed so that it is out of the way. Within 24-36 hours, a deep, frothy head will have formed on the surface as the yeast starts to eat the sugar and convert it to alcohol. Leave it for 4-6 days to ferment. The third picture below shows my brew on day four when it has calmed down a bit. When fermentation starts to slow down and bubbles can no longer be seen rising to the surface, and a scummy brown ring of dead yeast cells has been left around the inside rim of the brewing bin by the receding froth, check a sample of the beer with the hydrometer. It should read around 1008-1005 for this kit, though this will vary depending on your starting gravity and you should take always note of the manufacturer's suggested finishing gravity.
 |  |  |  |
In the final photo above, fermentation LOOKS as though it has stopped. Checking it with the hydrometer gives a reading of around 1020, which is much too high and suggests that the yeast has stopped working because of the extreme cold temperatures. (I brewed this batch at the beginning of February)
Despite using a thermostatic heater set at 20ºC, the back room of my shop has been losing too much heat at night and this has adversely affected the action of the yeast. To overcome this, I wrap the brewing bin in an old insulated foam camping "carrymat" and leave it for a few more days. In the end, I actually had to use a sachet of "Restart" which is a mixture of yeast and yeast nutrient to get this brew moving again.
A few days later, the fermentation has eased off again, and by checking with the hydrometer I found that the Specific Gravity had fallen to 1008. The finishing gravity will be lower than 1008 if you have used granulated sugar and higher if you have used beer enhancer or spray malt. If you check your brew and you find the same reading two days running, primary fermentation can be considered to have finished and you should raise the bin to table height to allow you use the syphon tube to transfer the beer to the sterilised bottles or pressure barrel. It WILL be heavy (around 35kgs) so care should be taken when lifting it off the floor. At this point, finings can be added if you wish to speed up the clearing process. Your beer will naturally clear, but some brewers prefer to reduce the amount of sediment prior to transferring their brew into their preferred storage medium.
Some home brewers use 1 pint glass bottles, which need to be sealed with crown caps, 1 litre PET bottles (Tonic, Bitter Lemon or Ginger Ale bottles are ideal. - Guess what I drink when I haven't got a barrel of beer on the go !!!), or the 2 litre empty water bottles to store their beer as the beer clears more quickly in smaller quantities. Others prefer a use a barrel as the beer matures better in large quantities and extra gas can be added if needed to maintain serving pressure. Furthermore, a barrel requires less effort to clean and sterilise than 40 bottles. I use a mixture of both methods. Bottles are much easier to put in the fridge than barrels which is obviously an important factor when serving Lager, but anything bigger than 1 pint or 1/2ltr will need to be decanted into a jug or another bottle as soon as you open it as you will disturb the sediment and lose all the CO2 pressure.
 |  |  |  |
A barrel clip is placed on the side of the bin and the syphon tube is inserted. This allows you to gradually lower the tube into the liquid without disturbing the sediment. Suck the end of the tube to get the brew moving and place the end into the barrel or the bottle. Fitting a tap (or a little bottler if filling bottles) makes it much easier to control the flow without flooding your kitchen, living room, shed etc. To "condition" the beer, you will need to add 1/2 teaspoon of sugar per pint to each bottle or 3oz (75g) if storing in a 5 gallon pressure barrel.This applies whether you are brewing a single can OR a two can kit. Some yeast cells will still be present in the brewing liquid and this will use the sugar to produce the Carbon Dioxide (CO2) gas that keeps it fresh and produces the head when poured. When barrelling my beer, I like to place the sugar (or in this case beer enhancer) in a clean,sterilised jug and mix it with around a pint of beer, before adding it back into the barrel. In these photos, I am using a 2 gallon barrel which will be stored in the shop for use as a "taster". The remaining 3 gallons will go into a 5 gallon barrel which will be taken home for "evaluation purposes".
 |  |  |  |
Cap and seal the bottles, if using crown caps and 1 pint glass bottles, or apply the cap to the pressure barrel, having first rubbed Vaseline around the thread to improve the seal, and place the beer in a warm place for 2 days to encourage the "left over" yeast to work. Move the bottles or barrel to a cool place and leave for at least 14 days to clear and mature before drinking. The barrel clip has allowed the syphon tube to be moved down to the bottom of the barrel to ensure that all the beer is transferred and none is wasted. You can ensure that you leave as little beer as possible behind by raising the base of bin and propping up the rear edge using a rubber bung, a barrel lid, a couple of books or even a door wedge. When you have syphoned off as much as you can, the yeast should be visible on the base of the brewing bin and will have formed a thick layer.
If you have used beer bottles, a layer of yeast will be deposited on the bottom of the bottle as the beer clears. When the bottle is opened, care should be taken to pour it slowly and gently into the glass, at a more or less horizontal angle, so as to avoid disturbing this sediment. With practice, you will be able to pour almost all of the beer before the yeast starts to get drawn toward the glass, at which point STOP.
If you are using a barrel, be VERY careful when you open the tap. The initial pressure will cause the first glass drawn to be expelled VERY quickly and it WILL overflow unless you are extraordinarily careful. You may also find that the first glass, when the head settles and disperses, is quite cloudy. Provided that you have left the beer for the recommended maturing period, this will usually be caused by the small amount of sediment that has settled in the chamber of the barrel tap whilst the beer has been clearing. Subsequent pints drawn should be crystal clear. If this isn't the case, try moving the beer to a cooler place for another week and then try again.
I would like to thank my daughter Joanne, who was 8 years old when this sequence was produced in 2009, for acting as my Brewing Assistant and model throughout this process. It is her hands that you can see in each of the photos and, whilst I did help with the cutting of the instructions, the pouring of the boiling water and the carrying of the 40 kg barrel, it was her that carried out ALL of the cleaning, brewing, syphoning and barrelling procedures, proving that brewing beer at home really is "child's play".
The major difference between single can and twin can beer kits it that the twin can kits contain 3.0-3.6 kgs of malt extract and thus don't need any additional sugar to be added at the start of the fermentation. Apart from this, the process is almost identical throughout the brewing and bottling/barrelling stages. The real difference is noted when you come to drink these beers. Beers made using large amounts of refined sugar tend to be thin beers compared to those made with sugars obtained from malted barley. As there is twice as much malt extract in the twin can kits, these produce a much fuller, smoother flavour than beers produced using single can kits.
If you like this page and found it useful, why not place a message in our Guestbook? If you would like to download a PDF version of this page which you can print off and use to your hearts content, please click here: Instructions for Brewing with Beer Kits:
Please Note: These instructions show how I make MY beer and are included for reference/guidance to demonstrate how the various processes look when I am making beer for my own consumption. The manufacturers instructions should ALWAYS be read to see if they have require any essential or additional processes that I haven’t used here, such as boiling the wort for a period of time or dry hopping the brew to improve flavour and aroma. CHS accepts no responsibility if your kit does not turn work because you failed to follow your kit’s instructions and used these ones instead. These instructions are made available free of charge and for personal use only and are subject to copyright. They must not be used elsewhere, either in printed or electronic format, without the prior consent of the owner, Colchester Homebrew Supplies.