Brewing Beer with Malt Extract
Brewing Beers with unhopped Liquid Malt Extract (or LME) is an easy way to create beers that are more to your specific taste than may be obtained from using a beer kit. It also allows you to choose which colours, flavours and bitterness levels YOU want in YOUR beer, although caution must be used as you will be dealing with fairly large quantities of BOILING LIQUID, which is obviously going to be quite dangerous if not handled properly.
In this section I am making a beer based on Courage Directors Bitter. This recipe was kindly provided by Pete Laycock and is used with permission from Stephen at www.yobrew.co.uk. To make 23ltrs of this beer, you will need:
2740 gms of Light Malt Extract
350gms of Crystal Malt
25gms of Black Malt
360gms of Brewing Sugar
Main Boil Hops:
25gms of Target Hops (AA 9.6%)
Late Boil Hops:
9gms of Styrian Goldings Hops (AA 2.5%)
5gms of Hallertau Mittlefruh Hops (AA 4.3%)
Water 25-30ltrs depending upon evaporation rates during the boil.
If you follow this recipe exactly, you will find that the colour is darker than the commercial version of Courage Directors that is currently brewed by Wells + Young (especially the canned version) and is nearer in colour to the version brewed by Courage that I started drinking some 20+years ago. If you wish to be closer in colour to the present version, you could easily leave out the Black Malt and reduce the Crystal Malt to around 275-300gms.
The easiest way to boil your WORT, the unfermented Water and LME mixture, is to use a thermostatically controlled boiler capable of holding 25 litres (unless you are making small tester batches of your brew, in which case you can use a large stockpot to boil the wort). Mine has a Hop Strainer fitted to the back of the tap to stop the tap getting clogged later in the process.
| |
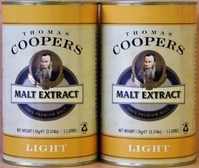

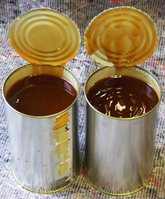
At the start of the process, I take 2 cans of 1.5kgs of Coopers Light Malt Extract, remove the labels and place the cans in a bowl of hot water to soften the contents. If you normally use your tap water to make up your beer kit and are happy with the taste, you can quite happily use this in your Malt Extract Beer, though I personally tend to use the same bottled water that I use when making up my kits as the chlorine that is often present in the drinking water can affect the finished flavour of the beer and give it a slight "TCP-like" taste. I sterilise the boiler, add about 10 litres of the bottled water and open the cans of Malt Extract.
| |

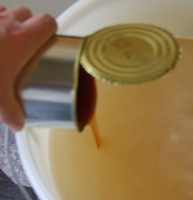

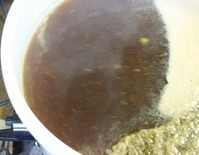
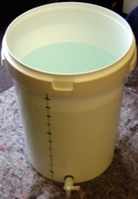
I turn up the thermostat to its highest setting and raise the water temperature to around 40°C. The 2740gms of Malt Extract is then added and stirred to ensure that it dissolves completely and doesn't stick to the bottom of the stockpot or boiler. (Any LME that is not used in the recipe can easily be stored in a sealed container in the fridge for later use). Once the Malt Extract has been fully dissolved, the remainder of the brewing water is added to the boiler. Notice how pale the wort is at this point. Dried Spraymalt can be used instead of Liquid Malt Extract, but it is harder to dissolve without it forming in to great big lumps when poured into the hot water and you would use slightly less in your recipe as it is approximately 20% more concentrated than LME.
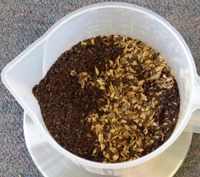
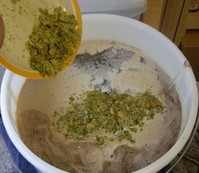
Whilst not necessary to produce a tasty, drinkable beer, various Coloured Malts and grains are usually added to the malt extract mixture to alter the flavour and colour of the finished beer, though you can just as easily leave them out if you are brewing a pale coloured, "Summer Ale" style beer. In this recipe, I am using the Black Malt and Crystal Malt to darken the colour of the beer and add a Caramel/Toffee flavour and help to produce a dry, aftertaste.
There are several ways to extract these colours and flavours, and the one you choose depends on your personal preference and the equipment you have available.Some brewers simply add all of the crushed grains to the wort as soon the LME has been dissolved in the hot water and leave them there until the end of the boil process. This is what I do with this recipe, simply to show that no ill effects come from doing it this way.
There are several ways to extract these colours and flavours, and the one you choose depends on your personal preference and the equipment you have available.Some brewers simply add all of the crushed grains to the wort as soon the LME has been dissolved in the hot water and leave them there until the end of the boil process. This is what I do with this recipe, simply to show that no ill effects come from doing it this way.
Other brewers object to this because it can create sharp, grainy, off tastes and instead suggest that you should place the grains in a muslin bag or straining bag , add them to the dissolved wort at the start of the heating process and then leave them there until the wort just starts to boil, by which time you will have more or less extracted the colours and flavours anyway. Placing the grains in a bag makes it easy to fish them out before you put in the hops.
Another group recommend carrying out a procedure known as a "Partial Mash" in a small volume of the brewing water and then using this to top up the boiler once the LME has fully dissolved. A "Partial Mash" is nothing more than a brewing term used to describe the process of mixing the grains in a quantity of cold water (usually around 1litre to each 500gms of grain) and gently raising its temperature to 65º-70ºC before simmering the mixture at that temperature for about 30-45 minutes. In order for the sugars contained in the coloured malts to be extracted, you will need to have added either a small amount of enzyme rich pale malt, or some DME (Diastatic Malt Extract), otherwise you will simply be extracting the colour and flavour. At the end of the simmering period you simply strain this liquid into the wort and proceed with bringing it to the boil. (This is MUCH easier if you have contained the grain in a bag throughout the mashing period).
| |
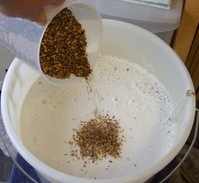
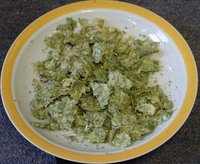
I pre-weigh the grain mix in a jug and add it carefully to the hot wort. Notice how quickly and effectively the colour of the wort changes. Whilst the wort is coming to the boil, I weigh out the first batch of hops. This recipe uses Target Hops as the main bittering hops.
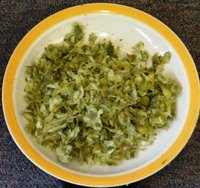
Different hop types produce widely different flavours and aromas and help to preserve your beer and prevent infection. (See our HOP section to see the various types available and the flavours they can produce in your beer). All hops have a "Bittering Strength" based upon the amount of a substance known as "Alpha Acid" they contain. This is usually expressed as a % of the total weight and, in general, the higher the Alpha Acid (AA) content of the hop, the less of the hop you need to use in your brew to obtain your preferred bitterness. Don't worry TOO much about this at the moment, as all the recipes are already formulated to use a specific amount of specific hops to produce the appropriate bitterness level for the beer you are brewing. Hops are usually available as dried cones and can be bought loose or vacuum packed. This batch of Target hops comes from a compressed block which has to be prised apart. The other two types of hops I use (Styrian Goldings and Hallertau) are vacuum packed loose leaf and are much easier to separate.
Different hop types produce widely different flavours and aromas and help to preserve your beer and prevent infection. (See our HOP section to see the various types available and the flavours they can produce in your beer). All hops have a "Bittering Strength" based upon the amount of a substance known as "Alpha Acid" they contain. This is usually expressed as a % of the total weight and, in general, the higher the Alpha Acid (AA) content of the hop, the less of the hop you need to use in your brew to obtain your preferred bitterness. Don't worry TOO much about this at the moment, as all the recipes are already formulated to use a specific amount of specific hops to produce the appropriate bitterness level for the beer you are brewing. Hops are usually available as dried cones and can be bought loose or vacuum packed. This batch of Target hops comes from a compressed block which has to be prised apart. The other two types of hops I use (Styrian Goldings and Hallertau) are vacuum packed loose leaf and are much easier to separate.
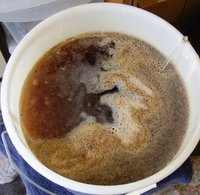
As soon as the wort comes to the boil, I add the Main Boil Hops. These are the primary, bittering hops (normally the largest quantity listed in your recipe, but it may actually be several different types depending on your recipe) and boil for around 90 minutes to extract the maximum amount of bittering oils.
| |


The hops will be quickly become waterlogged, be absorbed into the wort and join in a full rolling boil. You can put the lid on to improve heat retention, but there is always the possibility that you may simply increase the pressure and end up with a "Volcano" effect with hops and grains blowing out through the steam release hole in the lid of the boiler. I avoid this by leaving the lid off and adjusting the thermostat to maintain the boil, without creating a constant rolling boil. Some brewers insist that a full rolling boil should be maintained for the full 90 minute period, to maximise hop oil extraction and ultimate bitterness, but I haven't had any problems obtaining sufficient bitterness using my method, which has the added advantage of reducing the evaporation rate during the boil period. Approximately half way through the boil, I add the brewing sugar to the wort.
| |

Fifteen minutes before the end of the boil, I add the Late Boil Hops, which are the secondary, "aroma" and "flavouring" hops. Most recipes have a second addition of hops during the last 10-15 minutes of the boil to provide "aroma" and "flavour" for the finished beer. As the oils responsible for providing the aroma and flavour are fairly volatile and are easily driven off during a vigorous boil, they are only added for a short amount of time at the end of the boil to ensure that as many are kept in the wort as possible. A spoonful of Irish Moss, a form of dried seaweed, is also usually added at this point as it helps to clear the wort by causing the proteins released from the grains to clump together. Brewers call this action the "Hot Break" and it is more or less essential in producing a clear finished beer.
At the end of the boil, it is essential that you cool the wort rapidly to around 20-25ºC to produce the effect that brewers call the "Cold Break", during which the swollen and soggy remains of the hop cones and the clumps of protein created during the "Hot Break" sink to the bottom of your boiling vessel and help to ensure a clearer beer at the end of fermentation. Depending on what you have used as a boiler, the cooling method can be as simple as placing your boiler into a sink or bath of cold water (not recommended if you have used an electric boiler as you will "drown" your control unit and thermostat), dropping frozen bottles of water into the wort (provide you have removed the label and sterilised the outside of the bottles using your standard cleaning solution) or using one of the proprietary immersion coil or counterflow wort chillers that are available. These work by acting as a heat exchanger and transfer the heat from the boiled wort to the cooling water.
| |


As I have no running water available in the Unit, I have to fill a 60ltr bucket with cold water and use it to feed my immersion coil. You will notice that I have set the water reservoir above the boiler, which is in itself raised sufficiently far off the ground to allow me to place the fermenter below it to make it easy to collect the cooled wort ready for fermentation. Whilst more expensive than a sink/bath of cold water, an immersion coil can be used without having to move the boiler and its 25litres of freshly boiled liquid contents. A full boiler weighs around 30-35kgs and liquid is notoriously unstable when being moved, so from a Health and Safety point of view alone, a chiller is certainly worth its purchase price. It is also considerably cheaper than a new carpet or kitchen.....
One final thing to consider when using an immersion or counterflow wort chiller is that the first "outflow" of cooling water is likely to be around 75º-80ºC and will definitely kill your grass if you put it straight onto your garden. Far better to transfer it to a bucket and save it, with the next 15-20 ltrs or rapidly cooling outflow water, for washing up all of your equipment.
| |
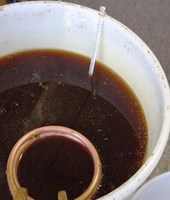

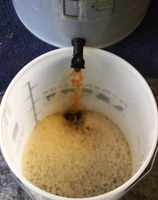
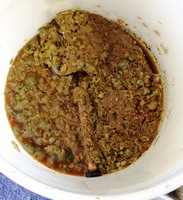
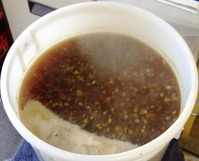
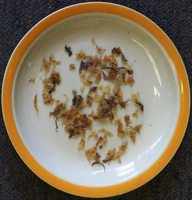
The temperature of the wort will drop quite rapidly and the hops and grain will quickly settle down towards the bottom of the boiler, as can be seen in the second photograph. The hops will act as a filter bed and prevent the grains from being sucked through the hop strainer and into the tap. Once the wort has cooled to around 25ºC, The tap can be opened and the wort allowed to run directly into the fermentation bin. This will cause the wort to froth up, which will help to aerate it ready for pitching the yeast. Once the boiler is completely drained, the hops and grain residue is easy to remove and can be happily added to a compost heap.
At this point, all that remains for you to do is to measure the Original Gravity using a hydrometer, pitch the yeast and allow fermentation to proceed as normal. When the primary fermentation has finished, and the Specific Gravity has dropped to around 1/4 of the Original Gravity, bottle or barrel as preferred and leave to condition as normal.
An alternative method of producing 23ltrs of malt extract beer using a stockpot , rather than a boiler, is to dissolve one can of the malt extract in approximately 7-8ltrs of water and boil it with the hops for about 45-60 minutes before straining the wort into your fermenter. If you boil for a full 90 minutes you will suffer fairly large evaporation losses. Add the remainder of the malt extract specified in the recipe and top up the fermenter with cold water. The addition of this 15-17ltrs of cold water should quickly cause the temperature to drop towards the 20°-24°C mark ready for pitching the yeast. To add extra flavour and colour, you would use coloured malts via any of the methods described above. You may, however find, that you need to increase the hop levels to compensate for the fact that there is often a poorer extraction rate of hop oils when boiled for less 90 minutes or in smaller quantities of liquid compared to the amount that is extracted when boiled in 23ltrs.
An alternative method of producing 23ltrs of malt extract beer using a stockpot , rather than a boiler, is to dissolve one can of the malt extract in approximately 7-8ltrs of water and boil it with the hops for about 45-60 minutes before straining the wort into your fermenter. If you boil for a full 90 minutes you will suffer fairly large evaporation losses. Add the remainder of the malt extract specified in the recipe and top up the fermenter with cold water. The addition of this 15-17ltrs of cold water should quickly cause the temperature to drop towards the 20°-24°C mark ready for pitching the yeast. To add extra flavour and colour, you would use coloured malts via any of the methods described above. You may, however find, that you need to increase the hop levels to compensate for the fact that there is often a poorer extraction rate of hop oils when boiled for less 90 minutes or in smaller quantities of liquid compared to the amount that is extracted when boiled in 23ltrs.
A complete version of these instructions is available for Download as a PDF file.